How to fly a positive Snap roll
Flick or Snap Roll
 Adrian WillisAdrian Willis
A Flick (UK term) or Snap roll (USA term) is a dynamic roll caused by 1 wing being completely stalled and the other wing being completely un-stalled and driving the roll round. At reasonable speed (120kts) it is easy to see and feel if the aircraft has flicked correctly but at lower speeds this is more difficult. The judges task is difficult and it is up to the pilot to show the judges that the snap roll meets the judging criteria. “Show the judge unambiguously what he wants to see and all will be well. Judges judge what they see, so just get it right … how hard can that be?” – famous words from a top International judge! The cynics would say that at Advanced and Unlimited level, the competition really becomes a snapping competition. The more measured would say that at the very least, learning to fly snap rolls really well is very important. The more agricultural would say to get a good score, snap at a high airspeed, there is some truth in this but actually getting the technique right is the real art and will give you the facility to get a good score for a snap at low airspeed when others PZ. If you get 1 or more PZ’s or HZ’s in a competition, it is unlikely you will win.
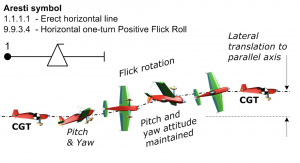 Fig 1
Fig 1
• Abruptly pitch positive or negative to briefly set the wings at a critical angle and cause an immediate semi-stalled condition.
• Yaw to unbalance the airflow between the wings, and so reduce the critical angle of one wing whilst increasing the other.
• The initial ‘nod’ and yaw (can be together or made as a quick “one-two”) must immediately produce rapid “auto-rotation”. “Auto-rotation” means that one wing has a higher angle of incidence than the other, is in a stalled condition and thus causing high drag, whilst the other wing has a lower angle of incidence, is not stalled and is still providing lift. In true auto-rotation NO aileron is required to initiate and drive the rolling motion – if you see in-flick aileron applied you might believe that the aeroplane is not really flicking.
• Throughout the flick-roll the aeroplane must remain auto-rotating by continued application of the initiating pitch and yaw control inputs. A translation to aileron rolling at any stage before the required angle of rotation has been completed would mean that the flick has ended early – a certain 1 point/5° downgrade.
• At the correct angle of rotation the roll should cease abruptly, and the aircraft should continue along an axis closely parallel to the extended pre-roll axis. This stoppage must primarily be driven by reduction in the pitch angle and removal of the yaw to un-stall the wings and restore balanced flight, so once again any aileron applied to stop the roll is not the appropriate control.
• Check carefully that the last part of the autorotation is not turned into an aileron roll to assist accurate end-stop positioning, a commonly adopted ploy that must be penalised.
Flick-rolls happen so rapidly that it is your subjective ‘perception’ as to whether the two essential components – pitch and yaw – have been successfully applied to cause autorotation and removed at the right moment to stop it. It is not possible to test the presence/absence of these ingredients from a video, so if you believe they were absent you must use the Perception Zero (PZ) rather than the Hard Zero (HZ).
• If the stall is inadequate the aircraft will fly a ‘barrelled’ roll with both wings providing lift, and considerable sideways translation from the starting axis is likely – this MUST be given a Perception Zero mark (PZ).
• Don’t forget also to check that the maneouvre you see is positive or negative – whichever one the sequence calls for. If it goes the ‘wrong way’ it must get a Hard Zero (HZ).
• Aircraft characteristics vary a lot in their requirements for flick initiation, and with some modern types the pitch movement can be quite small. For a given change in pitch angle the tail will probably move further than the nose, so look for a tail movement towards the wheels for a positive flick (as in the diagram above of a one-turn positive flick in level erect flight) and away from the wheels for a negative figure.
• However! It is the duty of the pilot to show you a flick-roll that convinces you it has met the above criteria. If you are unconvinced then clearly your perception is that the maneouvre has failed to meet the required criteria, and you must give a Perception Zero (PZ).
• If you see a ‘flick’ that in your opinion is not primarily driven by pitch & yaw or where aileron input is an obvious factor in driving the roll, then you should give it a Perception Zero (PZ).
• In every other important aspect the penalty to apply is the usual 1 point per 5° of inaccuracy observed.
Aircraft must show pitch and concurrently or consecutively yaw followed by roll (wing not aileron driven). The rate of roll is not supposed to be a judging criterion but if It rolls very slowly you will likely get a PZ and if it rolls really fast you probably won’t!
The guidance to judges says that the initiating pitch and yaw controls must remain applied, normally you will need to unload to drive the rotation round which appears to contradict this. The key point is the angle of attack needs to remain above critical on the inside wing and below critical on the outside wing. This will ensure it remains flicking. Understanding this explains the judging notes, some of the initiating back stick is taken off but enough is retained to ensure the inside wing is still stalled.
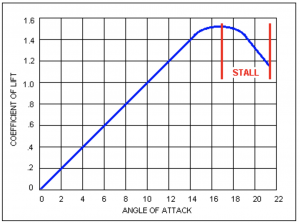 Fig 2
Fig 2
It is important to induce a very rapid nose up pitch, it needs to be rapid to instantly raise the angle of attack on both wings to almost critical but without causing a looping section. The concept is that when you introduce rapid yaw, the inside wing goes backwards and stalls and the outside wing goes forward and is at peak lift, the difference in lift between the wings drives the roll. Importantly, once the snap roll starts, the outside wing will move upwards and the relative airflow will reduce the angle of attack and the downward going, inside wing relative airflow will cause the angle of Atack to increase. The red lines in Fig 2 above will move further apart. This change caused by the rapid roll will further increase the speed of the roll. Interestingly the inside wing is now at significantly greater angle of attack above critical so that that unloading will not install it. If you bring the stick back too much, you will stall both wings and the snap will be “buried”, it will roll slowly or not at all, lose lots of energy and look awful. If it rolls, because the lift on both wings is near equal, it will be very barrelled. If you don’t bring the stick back enough, it may not flick at all and because neither wings are stalled, it will also be barrelled.
To get this correct in an Extra 200 (same for 300), bring the speed back to 100knots, reset the G metre and fly level. Sharply snatch the stick back and return it to almost the original position before the aircraft has the time to climb. The G meter should read 2.5G to 3.5G. It is important to be aggressive to make this work correctly.
Having practiced the back stick, when the weight hits your backside (seat of the pants) kick hard with your left foot. Keep the left rudder fully applied until you have completed one full rotation. Avoid applying aileron! Remember that all in-Snap aileron (left foot snap left aileron) will reduce the angle of attack on the inside wing and you need to do the opposite. In snap aileron will at the very least degrade the roll and quite probably cause the judges to award a PZ. Don’t worry about trying to recover yet wings level. Repeat this several times. Take a rest and on a later flight move to stage 3
Once the rotation starts, unload by smoothly moving the stick forward. It should almost hit the forward stop at the same time as the wings get level. Unloading makes the aircraft rotate faster because it reduces the cone angle of the roll. The law of conservation of energy mandates that energy can neither be created nor destroyed – only converted from one form of energy to another. If you have a large mass being driven around a large diameter cone and then reduce the diameter, it must accelerate. Interestingly, if you unload too much, rotation will stop but this is because the aerodynamic driving force is removed and the stalled wing un-stalling is likely to give more lift than the un-stalled wing with an equal reduction of alpha (see graph above). This is often fudged by unintentionally applying in snap aileron and it takes a lot of practice to avoid doing this.
Before you initiate the snap, look ahead near the horizon and pick an object on the nose. When you have completed the figure see if you are still pointing at the object. If you are not then you are either taking your left foot off too early (probable) or using too much or not enough right foot on recovery. You are training muscle memory, if you continue when you are tired you will perform badly which is demoralising, but you will also train the wrong muscle memory so make slow progress.
Practice snapping ensuring you are getting the wings level at the finish each time. Increase speed to 110 knots. When this is all working well, increase to 120 knots.
As the speed increases you will need to pull more G, theoretically not much more but in practice, the judges like to see separation between back stick and rudder, so by pulling more G you will find you can delay kicking fractionally longer, as the g subsides to the optimal level, and the separation will make it easier for the judges to see a good flick (snap)
We have only considered snapping positive straight and level. Although Extra aircraft have a snap limiting speed of 138 kts and it is dangerous to snap above this speed, more advanced aircraft like the Genevation GenPro have a snap limiting speed of 175 kts. This give much greater capability because rolls need to be centered on a line, if you have to delay the snap to get to snap limiting speed then the line before is likely to be much longer than the line after as the aircraft will be losing energy (think 45 up). Snap rolling using the conventional technique at 175 knots is quite likely to be so violent that at the very least your head will be punched through the canopy and worse you may have very serious neck lash. Clearly practice is needed reducing the unload and pulling back further (almost burying) so that the speed of rotation is reduced to manageable amounts. Naturally you would learn this at 140 knots and then gradually increase the entry speed as you develop the best technique. Once you have mastered this, you will be able to fly figures not possible in lessor aircraft.
Snapping at top of loop
Snapping on top of half loop up
Snapping on 45 up line
Snapping on 45 down line
Snapping on vertical down
Snapping on vertical up
Multiple snaps
Fractions of snaps
Snapping in both directions
Negative snaps
Each snap is different and requires a different technique. We will study this in further detail in a later blog.
1. Over stressing your aircraft: You must know the aircraft flick limiting speed and be sure not to exceed it.
2. Breaking your canopy, don’t flick at too high an airspeed in the latest generation aircraft (GenPro) or you will punch a hole in the canopy with your head!
3. If you do too many flicks, you will get tired and muscle memory won’t work properly. 5 or 6 flicks in one sortie, is probably enough
4. If you get your timing wrong and unload too early, it might flick negative. This can be confusing as it will rotate in the opposite direction, recovery is still to change feet on the rudder, i.e. if you kicked left, use the right rudder to stop it.
5. Make sure you have got enough height to spin and recover before going through your base height
6. As with everything, it is dangerous to learn this without a suitably experienced instructor helping you. Contact Adrian.Willis@BritishAerobaticAcademy.com to book a lesson