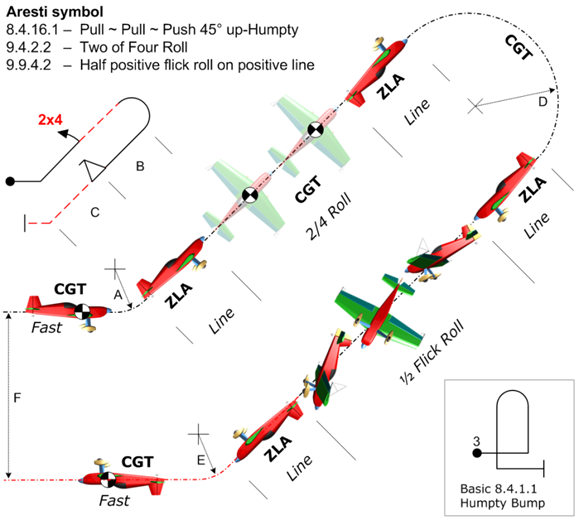
A ‘Humpty Bump’ is an aerobatic figure that comprises of two straight lines joined by a looping element. The lines can be either vertical or 45° lines and can start going up or down. Depending on the aerobatic level, there are often plenty of embellishments ensuring the K factor is high. Many Humpty Bumps will have a combination of slow and flick rolls on the up, down or 45° lines. You may also get a double version of the vertical Humpty Bump with the up version followed by a down version or vice versa. From this you can see that it is essential to be able to fly a high scoring vanilla “humpty”.
Judging Criteria
- Smooth CGT radius entry and pull / push to reach the first line.
- The first ZLA line, and assessment of any rolls super-imposed.
- A smooth radius half-loop.
- The second ZLA line, and assessment of any rolls super-imposed.
- The smooth radius pull / push and exit to level CGT flight.
- All partial loop segments may have different radii, and in a double-humpty the two half-loops may also be of different sizes.
How to Fly A Humpty Bump – Vertical
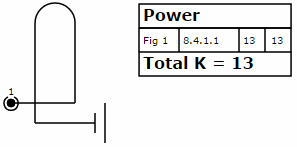
In this example, I will describe how to fly a basic Humpy Bump (category number 8.4.1.1). The key point here is the ‘pop’, ‘float’, ‘pull’ at the top in order to achieve a tight radius at the top and to start the down line at the same height as you finished the up line. I assume that height and speed is sufficient before you begin and HASELL checks have been completed.
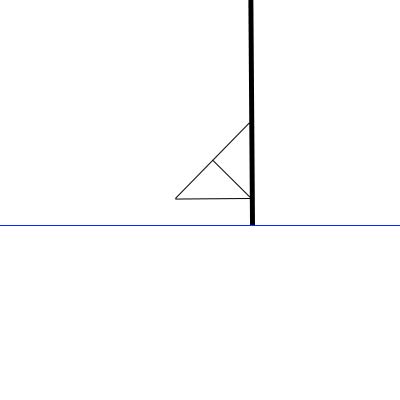
- Looking at the wing sight, apply backward stick to pull to the vertical until adjacent side of the triangular wing sight is parallel with the horizon
- When vertical, keep vertical (probably requires a small input of forward stick and right rudder)
- At approx 40kts, ‘pop’, ‘float’, ‘pull’
- Pop – pull back sharply and quickly on the stick to break the line so that the judges can see that any rolls were central.
- Float to gain a few extra feet
- Pull smoothly back on the stick until you hit the elevator stops. Ignore the stall buffet. This ensures you reach the vertical at the same height as breaking the vertical avoiding downgrades for “hooked top”
- Looking at the wing sight, fly a vertical down line.
- Pull at a constant radius to the horizontal
Common Mistakes
- Pulling too gently to the vertical so there isn’t enough energy to draw a good vertical line (important when adding vertical rolls)
- Not flying a truly vertical line up and down in pitch and yaw
- Not pulling to the stops causing a ‘hooked’ top
- Looking at the ground when vertically down instead of the wing sight (you can’t judge when you are exactly vertical without looking at the wing sight) and getting ‘ground shy’ encouraging you to pull up before you have drawn a vertical down line.
How to Fly a Humpty Bump – 45° (Diagonal Humpty Bump)
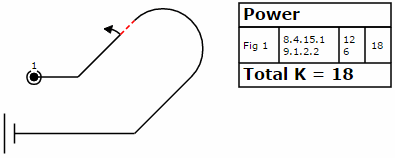
In this example I will describe how to fly a 45° Humpty Bump (category number 8.4.15.1). I have added a half roll on the 45° up line (category number 9.1.2.2) to make the majority of the figure positive G and therefore easier. The key point here is to pull gently at the beginning and then to float (like at the top of a loop), to make sure you fly a constant radius.
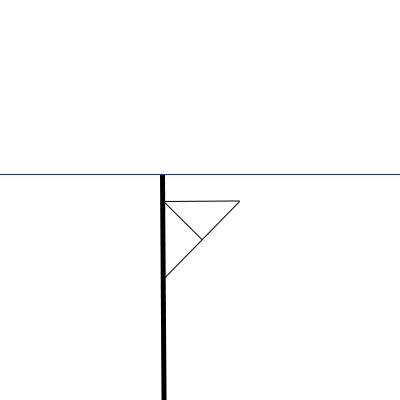
- Looking at your wing sight, pull to 45°
- Count “1 banana”, then looking at the wing sight, roll until the 45° wing sight line (hypotenuse of the triangular wing sight) reaches the horizon
- Making sure that you remain at 45°, count “1 banana, 2 banana”
- Pull relatively gently initially (slow speed) to set a relatively big radius which you can sustain in the second part where you are flying faster
- Float like you would at the top of a loop
- Increase the pull as the speed increases until your 45° down line on your wing sight is lined up with the horizon
- Draw a 45° line (the line doesn’t have to be the same length as the up line).
Common Mistakes
- Shallow 45° line after the roll
- Pulling at a constant rate during the looping element such that it is not a constant radius and is ‘pinched’
- Not drawing a 45° line afterwards
The judging criteria has been taken from CIVA Section 6 part 1 PDF from the CIVA website.
Please subscribe to our blogs. The more interested readers we have, the easier it is to justify on-going resources! If you have a question, please write a comment below. To book an aerobatic flight, contact Adrian on Adrian.Willis@BritishAerobaticAcademy.com or call or message him on 07712864413.
 Adrian Willis